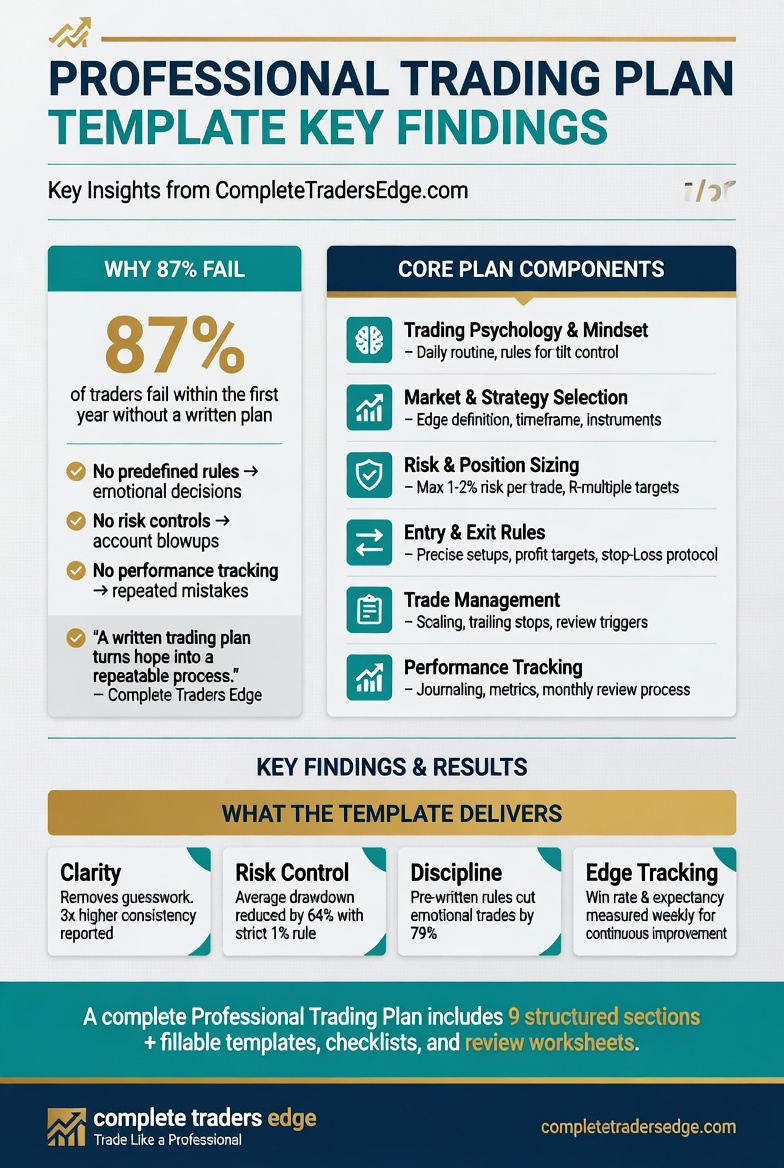
Most traders have a trading plan the same way most people have a gym plan — they wrote it once, it sits in a drawer, and they have not looked at it since. The plan becomes a statement of intention rather than an operational document, which means the moment pressure arrives in a live session, it provides exactly zero protection against impulsive decisions.
This guide gives you the complete professional trading plan template, structured around the Mind · Method · Money framework. Every section, every question, every rule you need to define before your next live trade. More importantly, it explains why each section exists — because a plan you understand is a plan you will actually follow.
What a Trading Plan Actually Does
A trading plan has one primary function: it separates the analytical phase from the execution phase. Analysis happens before the session — calm, methodical, without time pressure. Execution happens during the session — where you only need to determine whether the pre-defined conditions have been met, not make fresh decisions under pressure.
The traders who break their rules consistently are not lacking discipline. They are lacking a plan specific enough to be followed. “Wait for a good setup” is not a rule. “Enter only when price has swept the prior session low, formed a bullish 15M FVG, and closed above the sweep level during the London Kill Zone while the 4H structure is bullish” is a rule. The second version can be objectively verified. The first cannot.
A plan that cannot be objectively verified is not a plan. It is a preference — and preferences evaporate under pressure.
Section 1: The Trader Profile (MIND)
Before defining any trading rules, you need to define who is implementing them. This section creates self-awareness and grounds your plan in honest assessment rather than aspiration.
| Question | Your answer |
|---|---|
| What is my primary trading goal? | e.g. Build a funded account track record / Supplement income by $2,000/month / Qualify for a prop firm challenge by Q3 |
| What is my current experience level? | Beginner (under 1 year) / Developing (1-3 years) / Experienced (3+ years with documented edge) |
| What hours am I available to trade? | Specific time windows only — not “whenever the market is open” |
| What is my psychological profile? | Do I struggle with patience, revenge trading, cutting winners early, or holding losers? Be specific and honest. |
| What are my known weaknesses? | List the three rule violations you commit most often. Your plan must specifically address each one. |
The psychological profile section is not optional and not superficial. Every rule you write in the rest of the plan should be partly designed around the specific failure patterns you identify here. A trader who knows they struggle with FOMO needs a “missed entry = missed trade” rule written explicitly. A trader who holds losers needs a hard stop order requirement. The plan addresses the real person, not an idealised version.
Section 2: Markets and Instruments (METHOD)
You cannot be genuinely edge-positive across every instrument in every market. Specialisation is the foundation of sustainable performance. This section defines exactly what you trade and why.
| Component | Define specifically |
|---|---|
| Primary instruments | Maximum 2-3 instruments. e.g. Gold (XAU/USD) for day trading + NQ for NY session + BTC/USD for swing |
| Trading style | Day trader (no overnight holds) / Swing trader (multi-day holds) / Blended (swing positions + intraday) |
| Active sessions | London Kill Zone (07:00-10:00 GMT) / NY Kill Zone (12:00-15:00 GMT) / London Close (15:00-17:00 GMT) |
| Instruments I do NOT trade | Explicit exclusions. e.g. “No exotic pairs, no individual stocks, no instruments I have fewer than 50 documented trades on” |
Section 3: The Strategy and Entry Criteria (METHOD)
This is the most critical section. Every entry criterion must be binary — either the condition is met or it is not. If any single criterion requires a judgement call that could go either way depending on how you feel, it needs to be rewritten until it is specific.
Higher timeframe bias confirmation (required before any entry)
Write out exactly how you determine your Daily and 4H bias. What specifically must be true for you to call the bias bullish? What must be true for bearish? What makes you call it a range (and therefore avoid directional entries)?
Example: “4H structure is bullish when price is making higher highs and higher lows AND is currently above the most recent Break of Structure level. 4H structure is bearish when price is making lower highs and lower lows AND is below the most recent Break of Structure level. Anything else is range — no directional entries.”
Entry setup definition
Write the complete checklist for your primary setup. Every condition must be ticked before entry. A useful format:
| # | Entry criterion | Pass / Fail |
|---|---|---|
| 1 | Daily and 4H structural bias confirmed (bullish or bearish, not range) | ☐ / ☐ |
| 2 | Entry direction aligns with HTF bias | ☐ / ☐ |
| 3 | Current time is within a defined Kill Zone | ☐ / ☐ |
| 4 | Price has swept a relevant liquidity level (prior swing high/low, equal highs/lows) | ☐ / ☐ |
| 5 | A valid Order Block or FVG is present at the entry zone | ☐ / ☐ |
| 6 | Entry zone is in discount (for longs) or premium (for shorts) | ☐ / ☐ |
| 7 | Minimum 1:2 R:R to the next significant target level | ☐ / ☐ |
Adapt this checklist to your specific strategy. The number of criteria matters less than the specificity. If you cannot tick every box, you do not take the trade. This sentence should appear at the bottom of your printed checklist, visible during every session.
Stop loss placement rules
Define exactly where your stop loss goes for each setup type. “Beyond the Order Block” is not specific enough. “Stop loss placed below the low of the full Order Block zone, plus a 3-pip buffer for spread” is specific. Write it in enough detail that you could explain it to someone without any ambiguity about where the stop would be placed.
Target rules
Define how you identify your targets. First target: the nearest liquidity level (prior swing high for longs, prior swing low for shorts). Final target: the next significant HTF level. Define whether you take partial profits at the first target and run the remainder to the final target, or close the full position at the first target.
Section 4: Risk Management Rules (MONEY)
This section is non-negotiable. Every number in it is a hard rule, not a guideline. Write these as absolute limits that cannot be overridden regardless of circumstance, conviction level, or recent performance.
| Risk rule | Your specific number | What happens if breached |
|---|---|---|
| Maximum risk per trade | 1% of account (0.5% if in 5%+ drawdown) | Trade is not taken. No exceptions. |
| Daily loss limit | 2% of account | Session ends immediately. Platform closes. No re-entry until tomorrow. |
| Weekly loss limit | 5% of account | Move to demo for remainder of week. Review journal before resuming. |
| Maximum trades per session | 3 trades (regardless of how many setups appear) | Session ends regardless of remaining time in Kill Zone. |
| Minimum R:R per trade | 1:2 | Setup is not taken. Lower R:R setups do not exist in my plan. |
| Stop loss rule | Hard order placed immediately on entry. Never moved against the trade. | If stop is hit, trade is closed. No manual intervention. |
| News rule | No new entries within 15 minutes of red-folder events (NFP, FOMC, CPI) | Close existing positions or reduce to 0.5% size if already in trade. |
Section 5: The Rules for When NOT to Trade
This is the section most traders skip entirely. It may be the most valuable section in the plan. Explicitly defining the conditions that disqualify trading protects your capital during the moments when your discipline is at its weakest.
- Do not trade if: You have already hit the daily loss limit today.
- Do not trade if: The first trade of the session has been a loss — wait 30 minutes before reviewing charts again.
- Do not trade if: A red-folder news event is within 15 minutes.
- Do not trade if: It is outside a defined Kill Zone.
- Do not trade if: You are tired, stressed, distracted, or in an emotionally unsettled state. Write your emotional state check into your pre-session routine.
- Do not trade if: The instrument is exhibiting abnormal behaviour — extreme spread widening, gap-and-go price action with no structure, or a major news event is actively in progress.
- Do not trade if: You have already reached your maximum trade count for the session.
Section 6: The Daily Routine (MIND + METHOD)
The plan is only as good as the routine that activates it. Define the specific sequence of actions from waking up to the end of the trading session.
| Phase | Time | Actions |
|---|---|---|
| Pre-session | 30 min before Kill Zone | Review Daily + 4H charts. Mark key levels. Check economic calendar. Confirm HTF bias. Write two scenarios (bullish and bearish). Assess emotional state. |
| During session | Kill Zone only | Execute plan only. No new analysis. Entry checklist before every trade. Hard stop order on entry. Maximum 3 trades. |
| Post-session | Within 30 min of close | Journal every trade immediately: setup type, entry/stop/target, outcome in R, rule compliance grade (1-5), one lesson. Close charts. |
| Weekly review | Sunday, 30 min | Review week’s trades for rule compliance patterns. Score process compliance %. Identify one specific improvement. Review plan and update if needed. |
Section 7: The Drawdown Protocol (MONEY)
Define in advance — before you ever need it — exactly what happens at each drawdown level. Having this written means you never have to make decisions under emotional pressure about when to stop, reduce, or pause.
| Drawdown from peak | Action required |
|---|---|
| 3 consecutive losses | Reduce position size to 0.5%. Review journal for all three trades before taking another. |
| 5% account drawdown | Reduce to 0.25% risk. Detailed journal analysis. Review market conditions vs strategy requirements. |
| 10% account drawdown | Stop live trading. Move to demo. Systematic review before resuming. Do not return until cause is identified. |
| Return to live trading criteria | Five consecutive rule-compliant trades on demo with process compliance score of 90%+. Not based on winning or losing. |
Section 8: Plan Maintenance
A trading plan is a living document. Review it monthly. After every 50 trades, ask whether the rules still reflect how you trade at your best. If your execution has naturally evolved and the results support the change, update the plan. If the results do not support the change, revert.
The one rule about rule changes: never change your plan during a losing streak based on the losing streak. Changes made in drawdown are almost always emotional responses dressed up as analytical refinements. The only valid reason to change a strategy rule is evidence from a sufficient sample of trades — not the discomfort of recent losses.
Frequently Asked Questions
How long should a trading plan be?
Long enough to cover every decision you will face during a live session — no longer. A one-page plan that you actually follow is infinitely more valuable than a 20-page document that lives in a drawer. Most effective trading plans are between two and five pages. They cover instrument selection, entry criteria (checklist format), risk rules (specific numbers), the daily routine, and the drawdown protocol. If yours is longer than five pages, consider whether complexity is covering for a lack of clarity about what your actual edge is.
How often should I update my trading plan?
Review it monthly, update it only when you have evidence from at least 50 trades that a specific change is warranted. The most common mistake is updating the plan too frequently — particularly after losing streaks, where changes feel productive but are usually emotional. Stability in your plan, combined with consistent execution, is what allows you to gather the data needed to evaluate whether the strategy is genuinely working.
What if my entry criteria don’t produce enough setups?
This is the right problem to have. Fewer, higher-quality setups consistently produce better results than frequent, lower-quality ones. If your criteria are so specific that you are taking one or two trades per week, that is not a problem with the criteria — it is the correct calibration for a selective, disciplined approach. If you are taking zero trades over an extended period, that may indicate the criteria are too restrictive or the market conditions are not suitable for your strategy type.
Should my trading plan include specific setups with examples?
Yes, where possible. Including one or two annotated chart examples of what a valid setup looks like — specifically the entry candle, the confirmation signal, the stop placement, and the target — makes the criteria concrete rather than abstract. When you review your plan before a session, seeing a visual example of “this is what I am looking for” calibrates your pattern recognition far more effectively than reading a text description alone.
Is the Trading Plan Template lead magnet the same as this article?
The free 8-page Trading Plan Template available through the newsletter is a printable, fillable version of this framework with dedicated spaces for your specific rules, risk parameters, daily checklists, and weekly review forms. It is designed to be completed once and kept at your trading desk. This article explains the reasoning behind each section; the template gives you the structure to fill in. Both are useful but serve different purposes.
▶ ▶ ▶ Continue Reading
Build the complete Money framework
Free Download
Get the printable Trading Plan Template
The free 8-page fillable Trading Plan Template — with dedicated sections for every component in this guide, your entry checklist, risk rules, and weekly review form. Join the newsletter and it lands in your inbox immediately.
The Complete Trader’s Edge
The full trading plan framework is in the book
Chapters 46 and 47 cover the complete trade planning system in depth — from the pre-session routine through scenario planning, trade management, and the post-session review cycle that builds analytical quality over time. Available on Amazon in Kindle, paperback and full-colour editions.
 The Complete Trader's Edge
The full Mind · Method · Money framework. 70 chapters.
View on Amazon →
The Complete Trader's Edge
The full Mind · Method · Money framework. 70 chapters.
View on Amazon →
 Market Mayhem
400 years of bubbles, crashes, and the pattern that keeps repeating.
Buy on Amazon →
Market Mayhem
400 years of bubbles, crashes, and the pattern that keeps repeating.
Buy on Amazon →