

The Market Maker Model describes how dealing ranges form, how smart money engineers liquidity within them, and how to identify the moment a range breaks into a new delivery phase.
The ICT Market Maker Model, sometimes called the Dealer Model, is the overarching framework that ties together order blocks, fair value gaps, liquidity sweeps, and the Power of 3 into a single unified structure. It describes the complete lifecycle of a price move from the perspective of the market maker: the entity responsible for providing liquidity to both sides of the market and profiting from the difference.
Understanding the Market Maker Model changes how you see every chart. Ranges are no longer boring. They are the arena where the next significant move is being engineered.
The Dealing Range: Where Everything Starts
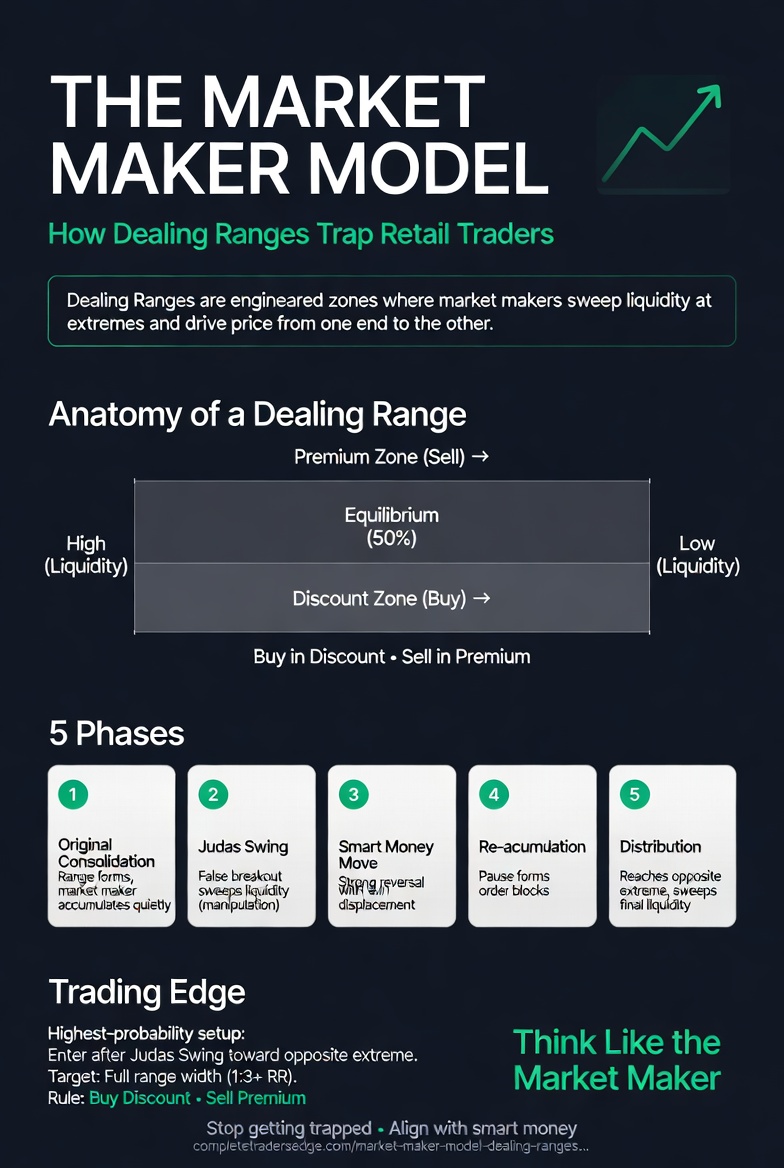
A dealing range is a defined price zone where the market maker has established positions on both sides. It has a clearly identifiable high, a clearly identifiable low, and an equilibrium level in the middle. The market maker’s objective is to move price from one extreme of the dealing range to the other, collecting liquidity at both ends.
Every significant dealing range contains liquidity at the high in the form of buy stops from short sellers, and liquidity at the low in the form of sell stops from long traders. The market maker needs both pools to execute their strategy.
The Five Phases of the Market Maker Model
Phase 1: Original Consolidation
Price establishes a range. Volume is moderate and price action is two-sided, creating equal participation from buyers and sellers. This range defines the dealing range boundaries. The market maker is accumulating a position during this phase, careful not to move price significantly in either direction.
Phase 2: Smart Money Reversal (Judas Swing)
This is the manipulation phase. Price makes a false move to one side of the dealing range, sweeping the liquidity at that extreme. In ICT terminology, this is called the Judas swing because it betrays the traders who believed the breakout was real. If the market maker intends to deliver price higher, the Judas swing goes lower first, taking out sell stops below the range.
Phase 3: Smart Money Accumulation/Distribution
After sweeping liquidity in the opposite direction, the market maker now has the orders needed to establish their true position. This phase often creates the displacement candle and fair value gap that marks the beginning of the real move. Price reverses from the Judas swing and moves back through the dealing range with conviction.
Phase 4: Re-accumulation/Re-distribution
As price moves through the dealing range, it may pause briefly to accumulate additional orders. These pauses create minor consolidation zones that can be used as entry points. Order blocks form during these pauses and become valid support or resistance on pullbacks.
Phase 5: Distribution/Reversal
Price reaches the opposite extreme of the dealing range and often extends beyond it to sweep the liquidity at that end. Once the opposing liquidity pool has been taken, the market maker’s objective is complete. Price may reverse into a new dealing range, or it may continue into the next higher-timeframe dealing range.
Identifying the Dealing Range in Real Time
Look for the most recent significant swing high and swing low on your analysis timeframe. This creates the dealing range. Calculate the equilibrium, which is the 50% level. If price is above equilibrium, it is in a premium zone, where you should be looking to sell. If price is below equilibrium, it is in a discount zone, where you should be looking to buy.
The premium and discount concept is one of the most practically useful aspects of the Market Maker Model. It provides an immediate filter for every trade: am I buying at a discount or selling at a premium? If neither, the probability is lower.
How to Trade the Model
The highest-probability entry within the Market Maker Model is after the Judas swing. Wait for price to sweep liquidity at one extreme of the dealing range, then enter in the opposite direction targeting the opposing extreme. This gives you the full width of the dealing range as your potential target.
Your entry confirmation should include a sweep of a clearly visible liquidity level, a displacement candle or break of structure in the direction of your trade, an entry at a fair value gap or order block left by the displacement, and a stop loss below the Judas swing wick.
The risk-to-reward on Market Maker Model trades is typically excellent, often 1:3 or better, because you are entering near one extreme and targeting the other. The dealing range width minus your stop distance creates a naturally favourable ratio.
Market Maker Model on Multiple Timeframes
The Market Maker Model is fractal. A daily dealing range contains smaller 4-hour dealing ranges within it. Each 4-hour range contains 15-minute dealing ranges. The institutional trader navigates by identifying the dealing range on their higher timeframe, determining which phase the current price action represents, and then dropping to a lower timeframe to find the specific entry within that phase.
The most powerful application is when the Judas swing on a higher timeframe creates the dealing range on a lower timeframe. A daily Judas swing that sweeps the previous week’s low and reverses creates a 4-hour dealing range with a clearly defined low. The 4-hour Market Maker Model then plays out within the context of the daily reversal, giving you both the macro direction and the micro entry.
The Mental Model
The Market Maker Model asks you to think like the entity running the market rather than the participant reacting to it. Before every trade, ask yourself: where is the liquidity? Where does the market maker need price to go to fill their orders? Which direction serves the market maker’s interest? If your trade aligns with the market maker’s likely objective, the probability is in your favour. If you are trading against it, you are the liquidity being consumed.
📚 Related Articles:
This article is adapted from The Complete Trader’s Edge
70 chapters covering Mind · Method · Money — the most comprehensive trading education framework available.
 The Complete Trader's Edge
The full Mind · Method · Money framework. 70 chapters.
View on Amazon →
The Complete Trader's Edge
The full Mind · Method · Money framework. 70 chapters.
View on Amazon →
 Market Mayhem
400 years of bubbles, crashes, and the pattern that keeps repeating.
Buy on Amazon →
Market Mayhem
400 years of bubbles, crashes, and the pattern that keeps repeating.
Buy on Amazon →
 Greatest Companies
How the world's greatest companies were built — and what traders learn from them.
View on Amazon →
Greatest Companies
How the world's greatest companies were built — and what traders learn from them.
View on Amazon →