Not all setups are created equal. After years of studying price action across markets, time zones, and instruments, certain patterns emerge with enough consistency and clarity that professional traders build entire careers around them.
What Makes a Setup High Probability?
A high-probability setup is one with positive expectancy — where the wins, when sized correctly, outpace the losses over a large enough sample. The setups below have two things in common: they occur at meaningful locations on the chart, and they have clear, logical invalidation points.
| Setup | Best Market Condition | Typical R:R | Key Requirement |
|---|---|---|---|
| OB + FVG pullback | Trending (after BOS) | 1:2 to 1:4 | HTF trend alignment + fresh OB |
| Liquidity sweep reversal | Range to trend transition | 1:3 to 1:5 | Clear equal highs/lows swept + ChoCH |
| Golden Pocket entry | Trending (pullback to 0.618-0.702) | 1:2 to 1:3 | Fibonacci + OB/FVG confluence |
| S/R polarity flip | After breakout | 1:2 to 1:3 | Clean break + retest of broken level |
| Breaker block entry | After OB failure/mitigation | 1:2 to 1:4 | Failed OB + displacement through |
| CME gap fill | BTC/ETH after weekend gap | 1:1.5 to 1:2 | 77% historical fill rate + directional bias |
| Kill Zone AMD setup | London/NY open | 1:2 to 1:3 | Asian range sweep + session reversal |
Setup 1: The Market Structure Break + Retest

This is the foundation of all technical trading. When price breaks a significant swing high or low, it signals a potential shift in market structure. The high-probability entry comes on the retest of that broken level. Wait for a confirmed break, drop to a lower timeframe, wait for price to return to the broken level, look for a rejection or ICT entry model, enter on confirmation with stop below the retest zone.
Setup 2: Fair Value Gap (FVG) Fill
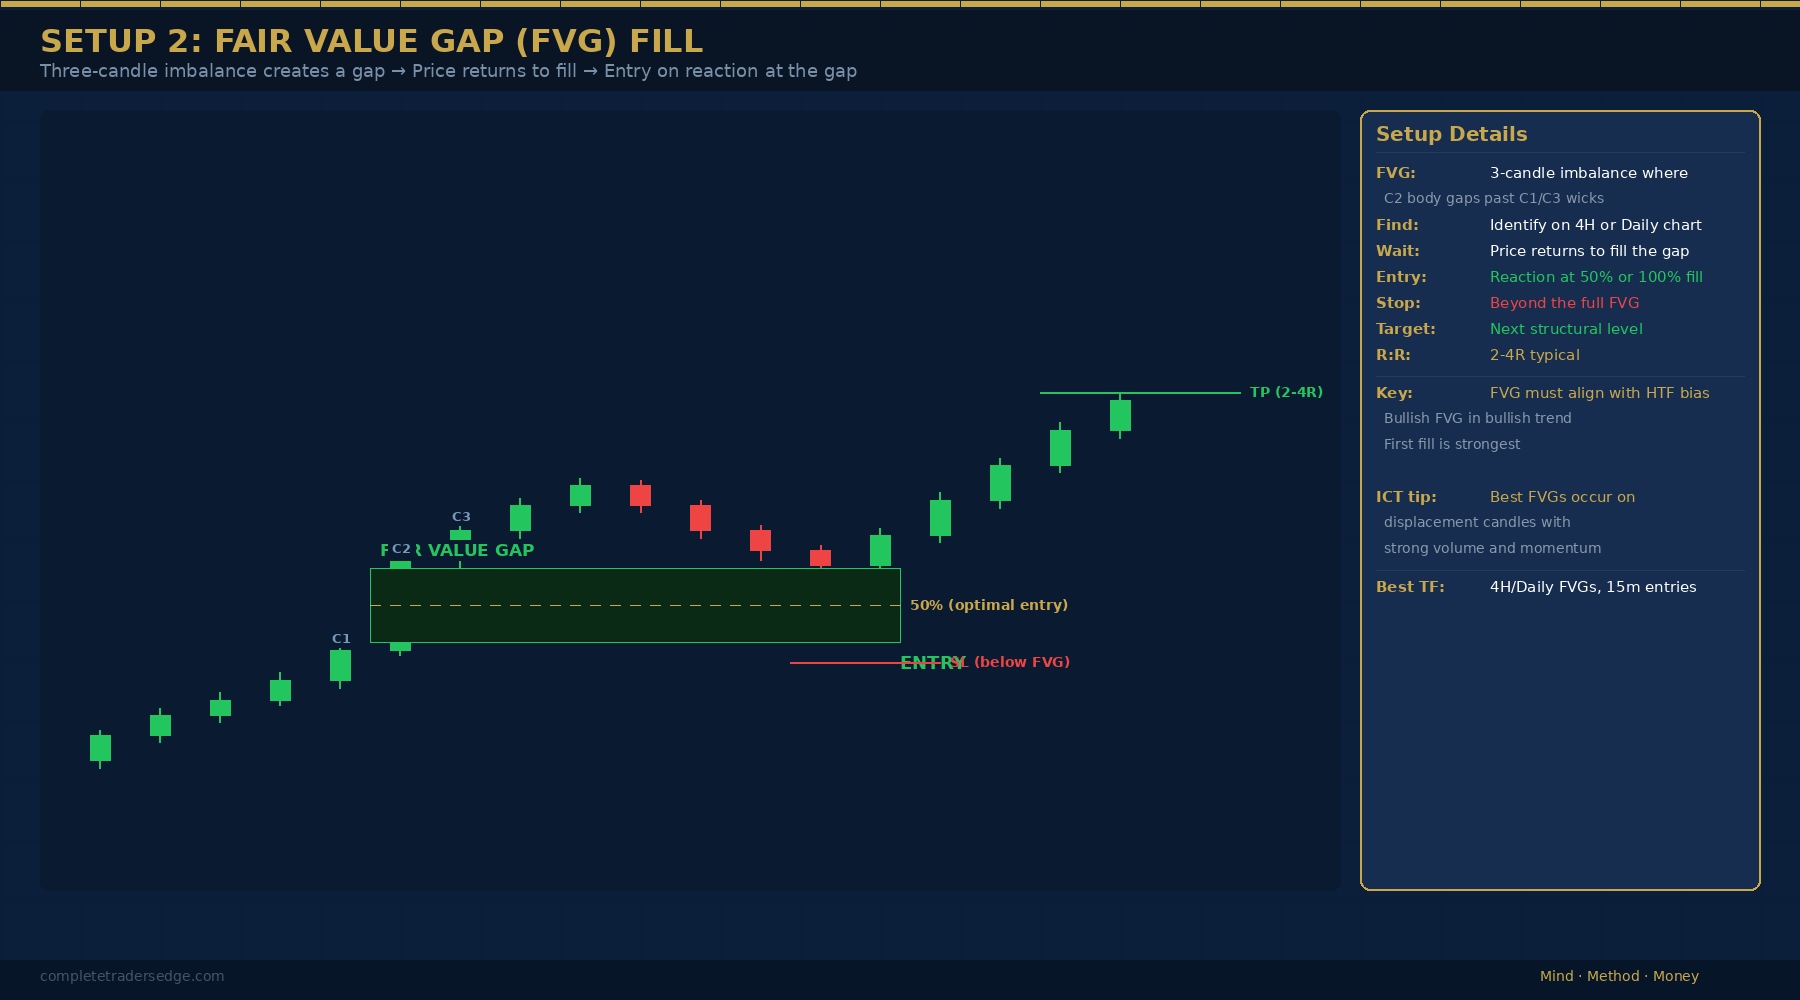
A Fair Value Gap occurs when a three-candle sequence creates an imbalance in price delivery. Price has a strong tendency to return and fill these gaps. Identify FVGs on 4H or Daily that align with your bias. When price returns to fill the gap, look for a reaction at the 50% or 100% fill level. Your stop goes beyond the FVG; your target is the next structure level in the direction of your bias.
Setup 3: Order Block Retest
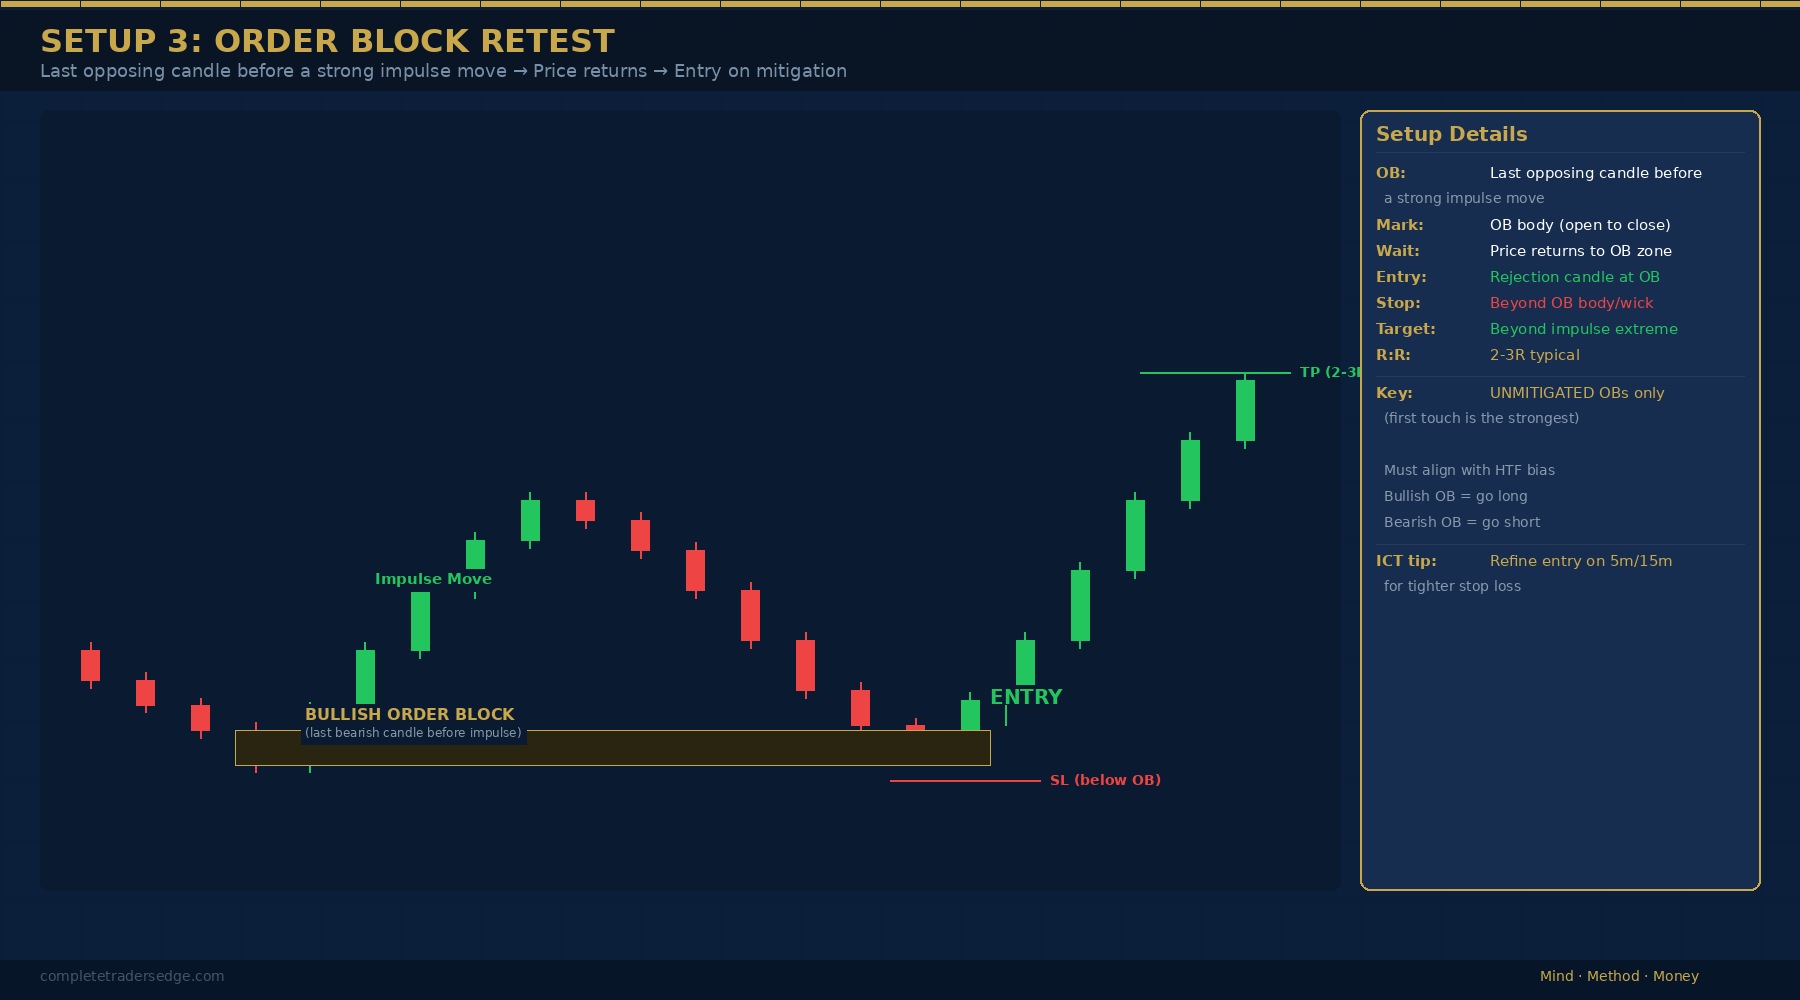
An order block is the last opposing candle before a strong impulse move — representing where institutional orders were placed. When price returns to an order block after a significant move away, those orders often provide powerful support or resistance. Mark the high and low of the last bearish candle before a strong bullish move (bullish OB) or last bullish candle before a strong bearish move (bearish OB). Enter on rejection with stop beyond the OB.
Setup 4: Liquidity Sweep + Reversal
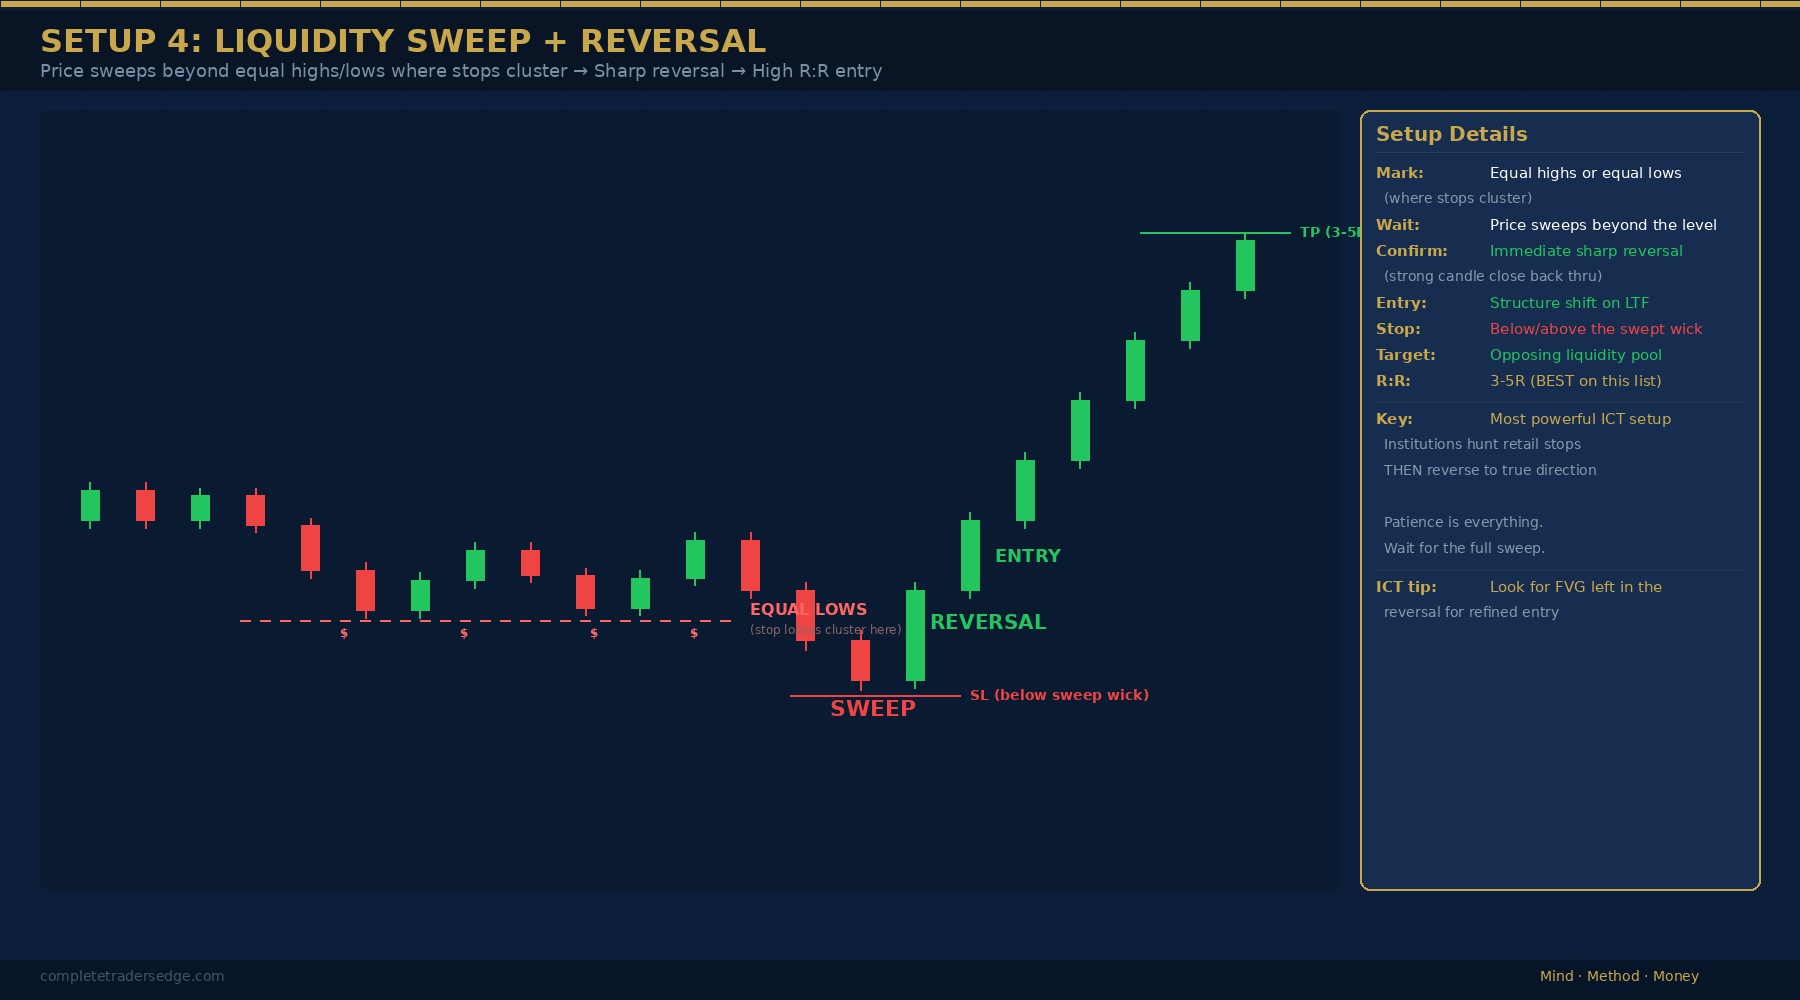
One of the most powerful setups in Smart Money trading. Price sweeps above a significant swing high or below a swing low, then reverses sharply. Mark significant swing highs and lows where stop losses cluster. Wait for price to sweep those levels with a sharp move. Then look for immediate reversal signals — a strong close back through the swept level, an FVG left in the sweep, or a shift in structure on the lower timeframe.
Setup 5: Support/Resistance Flip

When a key resistance level is broken and retested from above as support — or a support level is broken and retested from below as resistance — this S/R flip creates one of the most reliable trade locations on any timeframe. Mark major S/R levels on weekly and daily. When price breaks through with conviction and returns to the level, wait for a rejection signal on the 1H or 4H.
Setup 6: Inside Bar Breakout
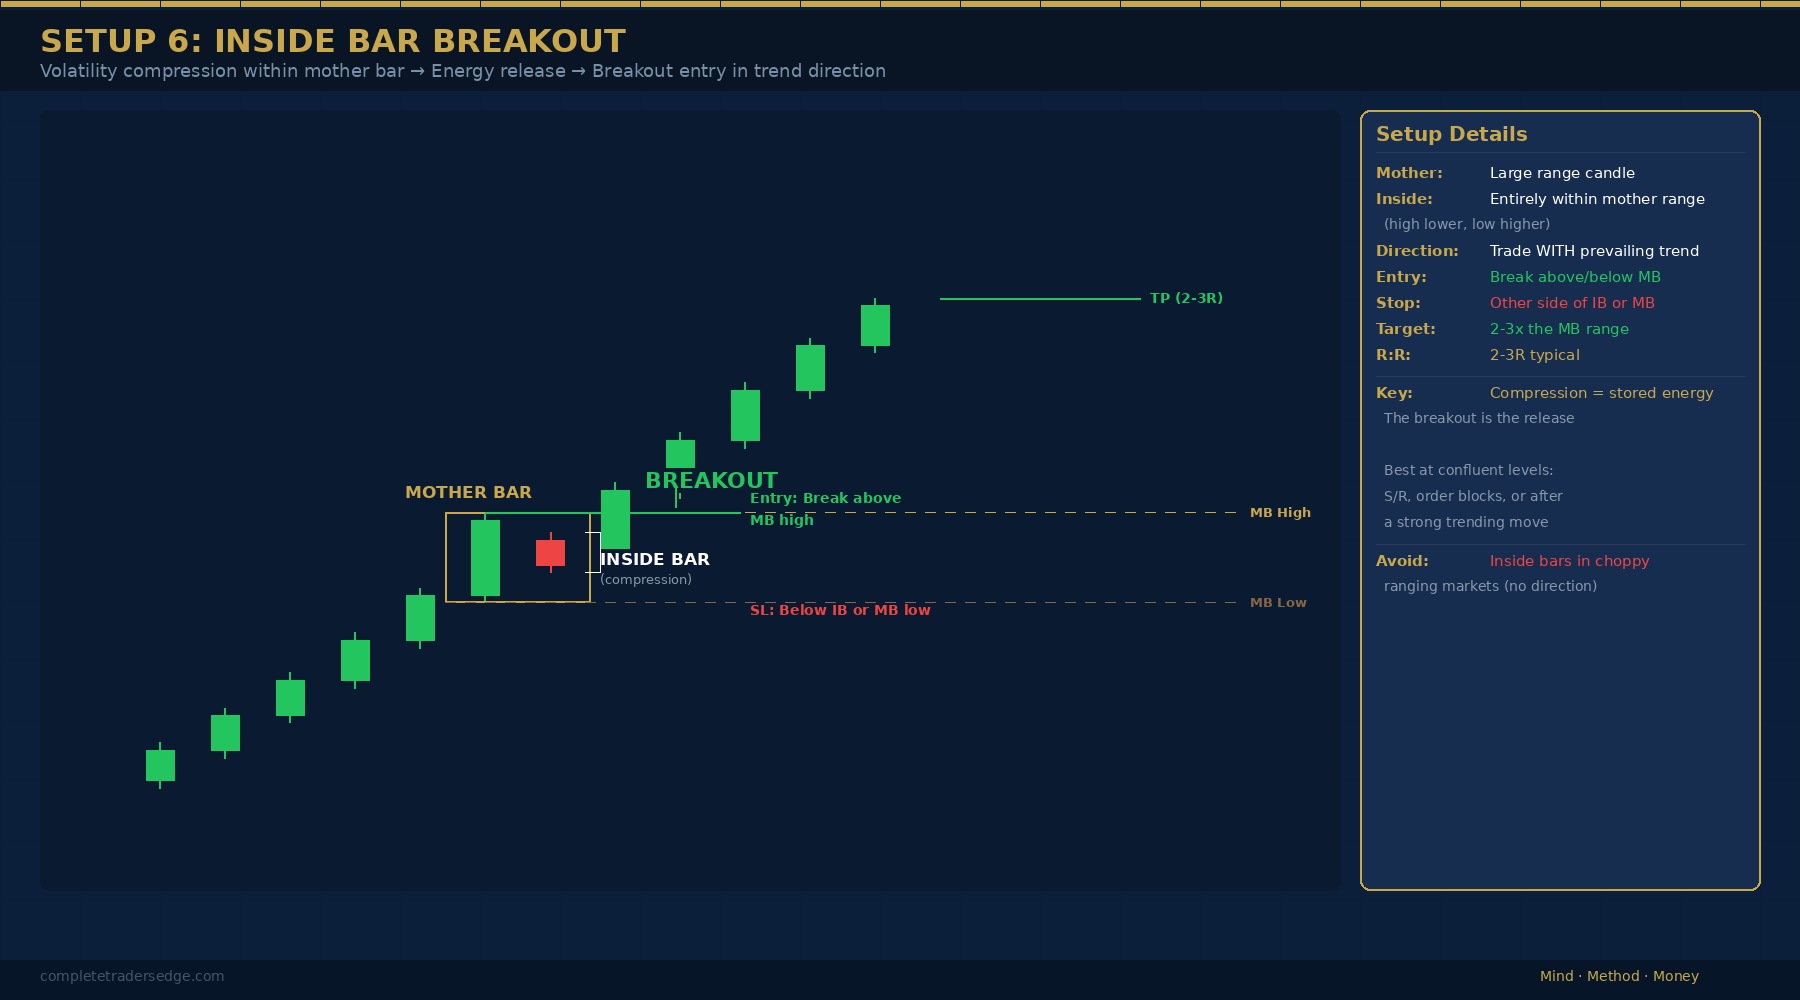
An inside bar forms when an entire candle’s range sits within the previous candle’s range — representing a compression of volatility and coiling of energy. Look for inside bars at key support/resistance levels, after a significant trend move, or at a higher-timeframe order block. Trade a breakout in the direction of the prevailing trend. Stop goes on the other side of the inside bar.
Setup 7: Session Open Displacement
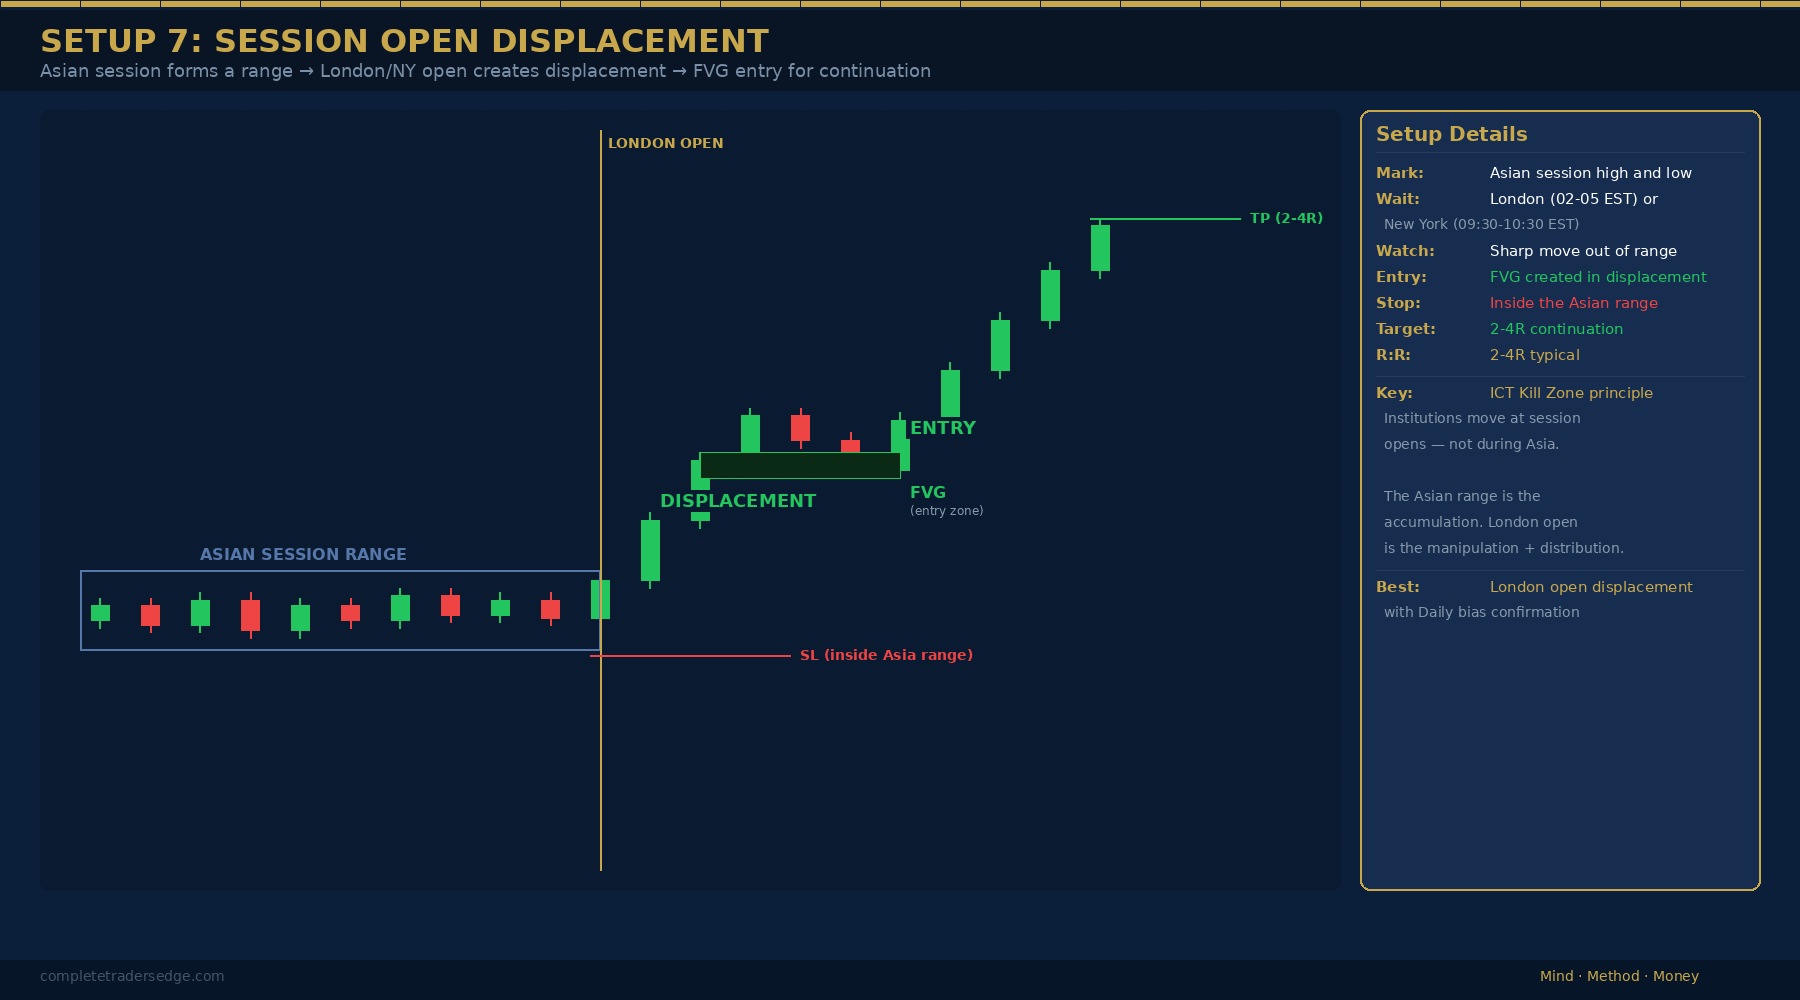
At the open of the London or New York session, institutions often make a sharp, directional move — displacing price from the quiet Asian session. Mark the Asian session range. At London open (2-3am EST) or New York open (9:30-10:30am EST), watch for a sharp move outside the range. The FVGs created in the initial displacement become high-probability entries for continuation trades.
The Most Important Rule Across All Setups
Every setup on this list is only valid when it aligns with your higher-timeframe bias. A bullish FVG in a bearish daily trend is not a high-probability trade — it’s a counter-trend gamble. The higher timeframe is always the boss. The best traders don’t have more setups than everyone else. They have fewer, better-understood setups, executed only when multiple factors align.
Frequently Asked Questions
What is the single best trading setup for beginners?
The pullback to an Order Block in a trending market is the most reliable starting setup. It combines trend alignment (highest probability direction), a defined entry zone (the OB), and clear stop loss placement (below the OB). Master this single setup before adding complexity.
How many setups should I trade?
One to three. Most profitable traders specialise in a small number of well-tested setups. A trader who executes one setup perfectly will outperform one who trades seven setups inconsistently. Add new setups only after you have 100+ live trades with your primary setup.
Do these setups work on all instruments?
Yes. The setups described are based on universal market structure and price action principles that apply to forex, Gold, BTC, indices, and stocks. The only adjustment is position sizing based on each instrument’s volatility and pip value.
What timeframe produces the best setups?
The 1-hour and 4-hour charts produce the most reliable setups for most traders. Higher timeframes (daily) offer higher-probability but fewer setups. Lower timeframes (15-min, 5-min) offer more setups but with more noise. Use multi-timeframe analysis: identify setups on the 4H/1H and refine entries on the 15-min.
How do I know when a setup has failed?
A setup has failed when your stop loss is hit. That is the definitive answer. The stop was placed at the point where the setup thesis is invalidated. If price reaches your stop, the setup was wrong on this occasion. Accept the 1R loss, log it in your journal, and move on to the next qualifying setup.
From The Book
This article covers concepts from Chapters 28-39 of The Complete Trader’s Edge.
Frequently Asked Questions
What makes a trading setup “high probability”?
A high-probability setup has three qualities: it aligns with higher timeframe market structure, it occurs at a level with multiple confluence factors (Order Block, Fibonacci, Volume Profile), and it offers a minimum 1:2 risk-to-reward ratio. The more confluence factors present, the higher the probability.
How many setups should I master?
Start with one. Master a single setup across one instrument in one Kill Zone before adding more. Most consistently profitable traders rely on 2 to 3 core setups, not dozens. Depth of mastery on a few setups beats shallow knowledge of many.
Should I trade every setup that meets my criteria?
Only if all criteria are fully met. Taking “almost” setups dilutes your edge. If 3 out of 4 criteria are present, that is not an 80% setup. It is a different setup entirely, one you have not tested. Patience to wait for the complete setup is what separates profitable traders from busy ones.
Do these setups work on all instruments?
The principles (structure, confluence, confirmation) are universal across forex, Gold, indices, crypto, and stocks. However, each instrument has its own personality: typical ranges, volatility characteristics, and session dynamics. Backtest any setup on your specific instrument before trading it live.
What is the best setup for beginners?
The pullback entry in a trending market. Identify a clear trend on the daily chart, wait for a pullback to a key level (Order Block or Fibonacci golden pocket) on the 4-hour, and enter on a confirmation candle on the 1-hour. This setup is intuitive, has clear rules, and naturally produces good R:R because you are trading with the trend.
From The Book
This article covers concepts from Chapter 39 of The Complete Trader’s Edge.